


参考講座
超Vue.js 2 完全パック (Vue Router, Vuex含む)
以下の記事の続きになります。
【Vue.js】Firebaseとaxiosを使ってサーバーにhttp通信をする方法
この記事を読むメリット
以下のメリットが得られます。
- tokenの役割について理解できる。
- Firebaseを用いた認証機能を理解できる。
- Vue.jsを用いてユーザー登録、ユーザー認証(ログイン)機能の実装方法を理解できる。
- vue-routerを用いて、フロントエンドでルーティングする方法を理解できる。
- ログアウト機能の実装方法を理解できる。
token: トークンについて
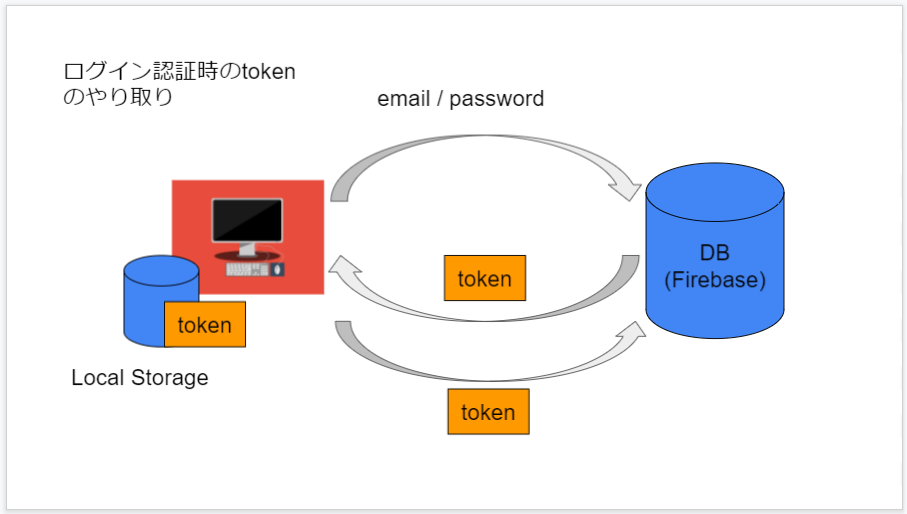
ユーザー名とパスワードを指定しないとサーバーからtokenが返却されない。
tokenには、いつ作られたのか、ユーザーは誰なのか、token有効期限はいつまでなのか、といった情報が含まれている。この符号化された情報(token)をローカルに一時保存して、それをサーバーへ返す。
これによりtokenが一致していることから、ログインができるようになる。
※firebase tokenの場合、有効期限は1時間
ログインフォームの実装
vue-router のインストール
routerの設定
src/router.js
Routerの記載と、viewのパスを3つ(Comments, Login, Register)を記述します。
import Vue from 'vue';
import Router from 'vue-router';
import Comments from './views/Comments.vue';
import Login from './views/Login.vue';
import Register from './views/Register.vue';
Vue.use(Router);
export default new Router({
 mode:'history',
  routes:[
   {
      path:'/',
      component:Comments
    },
    {
      path:'/login',
      component:Login
    },
    {
      path:'/register',
      component:Register
    },
  ]
});
src/main.js
routerを追加します。
import Vue from 'vue';
import App from './App.vue';
import axios from 'axios';
import router from './router';

Vue.config.productionTip = false;
axios.defaults.baseURL = "https://firestore.googleapis.com/v1/projects/[PROJECT_ID]/databases/(default)/documents";

new Vue({
router,
render: h => h(App),
}).$mount('#app')
[PROJECT_ID]の部分は、後述するFirebaseのプロジェクトの設定で確認するプロジェクトIDに変更する。
src/App.vue
<template>
<div id="app">
 <header>
  <router-link to="/" class="header-item">掲示板</router-link>
  <router-link to="/login" class="header-item">ログイン</router-link>
  <router-link to="/register" class="header-item">登録</router-link>
 </header>
 <router-view></router-view>
</div>
</template>

<style scoped>
.header-item{
 padding: 10px;
}
</style>

<style>
#app {
 font-family: Avenir, Helvetica, Arial, sans-serif;
 -webkit-font-smoothing: antialiased;
 -moz-osx-font-smoothing: grayscale;
 text-align: center;
 color: #2c3e50;
 margin-top: 60px;
}
</style>
画面(掲示板、ログイン、登録)の作成
vueファイルを3つ作成します。
src/views/Comments.vue
<template>
<div>
 <h3>掲示板に投稿する</h3>
 <label for="name">ニックネーム</label>
 <input id="name" type="text" v-model="name">
 <br><br>
 <label for="comment">コメント</label>
 <textarea id="comment" v-model="comment"></textarea>
 <br><br>
 <button @click="createComment">コメントをサーバーに送る</button>
 <h2>掲示板</h2>
 <div v-for="post in posts" :key="post.name">
 <br>
  <div>名前:{{post.fields.name.stringValue}}</div>
  <div>コメント:{{post.fields.comment.stringValue}}</div>
 </div>
</div>
</template>

<script>
import axios from "axios";
export default {
 data(){
  return{
   name:"",
   comment:"",
   posts:[]
  };
 },
 created(){
  axios.get(
   "/comments"
  ).then(response=>{
   this.posts = response.data.documents;
   console.log(response.data.documents);
  });
 },
 methods:{
  createComment(){
   axios.post("/comments",
  {
   fields:{
   name: {
    stringValue: this.name
   },
   comment:{
    stringValue: this.comment
   }
  }
 }).then(response => {
  console.log(response);
 }).catch(error => {
  console.log(error);
 });
   this.name="";
   this.comment="";
  }
 }
}
</script>
src/views/Login.vue
<template>
<div>
 <h2>ログイン</h2>
 <label for="email">Email</label>
 <input id="email" type="email" v-model="email">
 <br><br>
 <label for="password">Password</label>
 <input id="password" type="password" v-model="password">
<br><br>
 <button @click="login">ログイン</button>
</div>
</template>

<script>
export default {
 data(){
  return{
   email:"",
   password:""
  }
 },
 methods:{
  login(){
  }
 }
}
</script>
src/views/Register.vue
一旦はLogin.vueとほぼ同じ感じ(コピペ)で作成します。
<template>
<div>
<h2>登録</h2>
<label for="email">Email</label>
<input id="email" type="email" v-model="email">
<br><br>
<label for="password">Password</label>
<input id="password" type="password" v-model="password">
<br><br>
<button @click="register">登録</button>
</div>
</template>

<script>
export default {
 data(){
  return{
   email:"",
   password:""
  }
 },
 methods:{
  register(){
  }
 }
}
</script>
この段階で以下のように表示されます。
掲示板

ログイン

登録

掲示板については、前回記事で名前とコメントを入力して、ボタンを押すと名前とコメントが画面に表示されます。
ログインと登録は、この段階で画面表示のみとなります。
Firebase Authenticationの利用
Authentication→Sign-in method→メール/パスワードをクリック

有効にする。

利用方法について
https://firebase.google.com/docs/reference/rest/auth
エンドポイント
このURLをコピーする。
src/axios-auth.js
ファイルを以下のように作成する。
コピーしたURLをbaseURLの部分に張り付ける。
import axios from "axios";

const instance = axios.create({
baseURL:'https://identitytoolkit.googleapis.com/v1'
});

export default instance;
accounts:signUp?key=[API_KEY]
の部分を削除する。
API_KEYの確認
プロジェクトを設定をクリック

ウェブAPIキーをコピーする。

ユーザー登録機能の実装
src/views/Register.vue
axios.postの引数にaccounts:signUp?key=[API_KEY]
と記載して、[API_KEY]をウェブAPIキーに変更する。
<script>
import axios from '../axios-auth';
 export default {
  data(){
   return{
    email:'',
    password:''
   }
  },
 methods:{
  register(){
   axios.post(
    '/accounts:signUp?key=[API_KEY]',
   {
    email:this.email,
    password:this.password,
    returnSecureToken:true
   }).then(response=>{
    console.log(response);
   });
  }
 }
}
</script>
第二引数にはリクエストボディペイロードを参考に
https://firebase.google.com/docs/reference/rest/auth
メール、パスワード、トークンを記載。

firebase 側でユーザーを確認

ユーザー情報が登録されていることを確認。
ログイン認証の実装
firebase側で確認したAPIキーを元に、下のURLの[API_KEY]部分を変更しておきます。
Register.vueとほぼ同じなので、<script>タグの部分をコピーして、Login.vueに張り付けます。
メソッド名をlogin、postの第一引数のURLパスを
/accounts:signInWithPassword?key=[API_KEY]
に変更します。
<script>
import axios from '../axios-auth';
export default {
 data(){
  return{
   email:'',
   password:''
  }
 },
 methods:{
  login(){
   axios.post(
    '/accounts:signInWithPassword?key=[API_KEY]',
   {
    email:this.email,
    password:this.password,
    returnSecureToken:true
   }).then(response=>{
    console.log(response);
   });
  }
 }
}
</script>
この状態でログイン画面側を確認してみます。
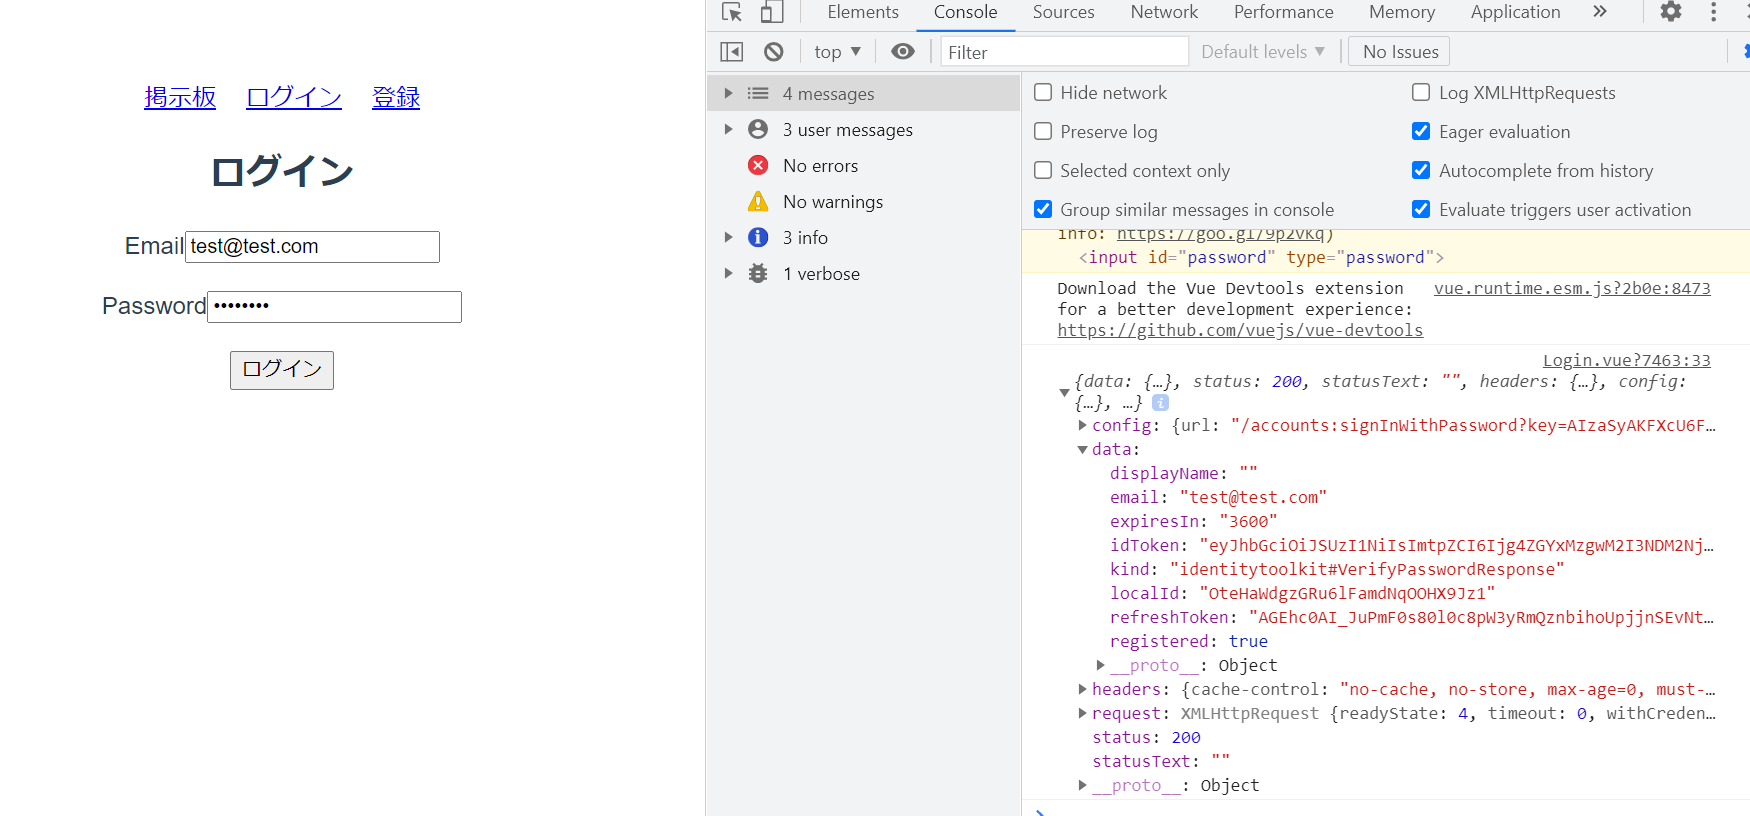
ステータス200でうまくいってそうなことがわかります。
firebaseの設定
firebase上のcloud Firestoreにあるルールで
のようにすることで、ログインしていない(tokenがない)と、ボードに投稿内容が表示されないようにすることができます。
投稿データの受け渡し
投稿した内容を、掲示板上に表示するために、データを受け渡す必要があります。
データの受け渡しにはvuexを利用します。
vuex をインストール
src/store/index.js
Login.vueのactions(login, register)の内容をこちらに記載。
import Vue from 'vue'
import Vuex from 'vuex'
import axios from '../axios-auth';

Vue.use(Vuex);

export default new Vuex.Store({
 state:{
  idToken: null
 },
 getters: {
  idToken: state => state.idToken
 },
 mutations:{
  updateToken(state, idToken){
   state.idToken = idToken;
  }
 },
 actions: {
  login({commit}, authData){
   axios.post(
    '/accounts:signInWithPassword?key=[API_KEY]',
   {
    email:authData.email,
    password:authData.password,
    returnSecureToken:true
   }).then(response=>{
    commit('updateToken', response.data.idToken);
    console.log(response);
   });
 },
 register({commit}, authData){
   axios.post(
    '/aaccounts:signUp?key=[API_KEY]',
   {
    email:authData.email,
    password:authData.password,
    returnSecureToken:true
   }).then(response=>{
    commit('updateToken', response.data.idToken);
    console.log(response);
   });
 }
});
loginにはaccounts:signInWithPassword?
registerにはaccounts:signUp?
を使う
src/views/Login.vue
<template>
<div>
 <h2>ログイン</h2>
 <label for="email">Email</label>
 <input id="email" type="email" v-model="email">
 <br><br>
 <label for="password">Password</label>
 <input id="password" type="password" v-model="password">
 <br><br>
 <button @click="login">ログイン</button>
</div>
</template>

<script>
export default {
 data(){
  return{
   email:'',
   password:''
  }
 },
 methods:{
  login(){
   this.$store.dispatch('login', {
    email: this.email,
    password: this.password
   });
   this.email='';
   this.password='';
  }
 }
}
</script>
this.$store.dispatchでemailとpasswordをstore側に渡す。
tokenをヘッダーにつけてリクエストを送る。
src/views/Comments.vue
<script>
import axios from "axios";
export default {
 data(){
  return{
   name:"",
   comment:"",
   posts:[]
  };
 },
 computed: {
  idToken(){
   return this.$store.getters.idToken;
  }
 },
 created(){
  axios.get(
   "/comments", {
    headers: {
     Authorization: `Bearer ${this.idToken}`
    }
   }
  ).then(response=>{
   this.posts = response.data.documents;
   console.log(response.data.documents);
  });
 },
 methods:{
  createComment(){
   axios.post("/comments",
   {
    fields:{
     name: {
      stringValue: this.name
     },
     comment:{
      stringValue: this.comment
     }
    }
   },{
    headers: {
     Authorization: `Bearer ${this.idToken}`
    }
   }).then(response => {
    console.log(response);
   }).catch(error => {
    console.log(error);
   });
   this.name="";
   this.comment="";
  }
 }
}
</script>
computedでidTokenを取得する。
axios.getの第二引数、axios.postの第三引数にheadersを追加する。
これにより、ログイン後、コメントが掲示板に表示されるようになる。
また投稿した内容も表示されるようになる。
ログイン認証による掲示板表示
src/router.js
ログインしていないと、掲示板は表示できない、遷移できないようにする。
import store from './store';
Vue.use(Router);

export default new Router({
 mode:'history',
 routes:[
  {
   path:'/',
   component:Comments,
   beforeEnter(to, from, next){
    if (store.getters.idToken) {
     next();
    } else {
     next('/login');
    }
   }
  },
  {
   path:'/login',
   component:Login,
   beforeEnter(to, from, next){
    if (store.getters.idToken) {
     next('/');
    } else {
     next();
    }
   }
  },
  {
   path:'/register',
   component:Register,
   beforeEnter(to, from, next){
    if (store.getters.idToken) {
     next('/');
    } else {
     next();
    }
   }
  },
 ]
});
beforeEnterを追加する。
既にログインしている場合、掲示板を表示する。
ログインしていない場合、/login に飛ばす。
ログインと登録をクリックしたとき、ログインしていれば、掲示板へ飛ばす。
ログインした後に、掲示板の方へ飛ぶようにする。
src/store/index.js
 actions: {
  login({commit}, authData){
   axios.post(
    '/accounts:signInWithPassword?key=[API_KEY]',
    {
     email:authData.email,
     password:authData.password,
     returnSecureToken:true
    }).then(response=>{
     commit('updateToken', response.data.idToken);
     console.log(response);
     router.push('/');
    });
  },
  register({commit}, authData){
    axios.post(
    '/accounts:signUp?key=[API_KEY]',
    {
     email:authData.email,
     password:authData.password,
     returnSecureToken:true
    }).then(response=>{
     commit('updateToken', response.data.idToken);
     console.log(response);
     router.push('/');
    });
  }
 }
loginとregisterのaxios.post().thenに
router.push(‘/’);
を追加する。
App.vueにisAuthenticatedを加えて、ヘッダーの表示制御をする。
<script>
  export default {
    computed: {
      isAuthenticated(){
        return this.$store.getters.idToken !== null;
      }
    }
  };
</script>
ログインしていれば、”掲示板”を表示
      <template v-if="isAuthenticated">
        <router-link to="/" class="header-item">掲示板</router-link>
      </template>
ログインしていない場合、”ログイン”と”登録”を表示
     <template v-if="!isAuthenticated">
        <router-link to="/login" class="header-item">ログイン</router-link>
        <router-link to="/register" class="header-item">登録</router-link>
      </template>
tokenの自動更新
※tokenを更新する場合
UXとのトレードオフ(セキュリティを重視するか、利便性を重視するか)
1時間でtokenの有効期限が切れるため、1時間おきにidTokenを更新する処理を追加する。
src/store/index.js
actions内にsetAuthData関数を作り、localStorage.setItemでidToken、expiryTimeMs、refreshTokenをローカルストレージにセットする。
 actions: {
  async autoLogin({commit, dispatch}){
   const idToken = localStorage.getItem('idToken');
   if (!idToken) return;
   const now = new Date();
   const expiryTimeMs = localStorage.getItem('expiryTimeMs');
   const isExpired = now.getTime() >= expiryTimeMs;
   const refreshToken = localStorage.getItem('refreshToken');
   if (isExpired) {
    await dispatch('refreshIdToken', refreshToken);
   } else{
    const expiresInMs = expiryTimeMs - now.getTime();
    setTimeout(()=>{
     dispatch('refreshIdToken', refreshToken);
    }, expiresInMs);
    commit('updateIdToken', idToken);
   }
  },
  login({dispatch}, authData){
   axios.post(
    '/accounts:signInWithPassword?key=[API_KEY]',
   {
    email:authData.email,
    password:authData.password,
    returnSecureToken:true
   }).then(response=>{
    dispatch('setAuthData', {
     idToken: response.data.idToken,
     expiresIn: response.data.expiresIn,
     refreshToken: response.data.refreshToken
   });
   router.push('/');
  });
 },
 async refreshIdToken({dispatch}, refreshToken){
  await axiosRefresh.post('/token?key=[API_KEY]',
  {
   grant_type: 'refresh_token',
   refresh_token: refreshToken,
  }).then(response=>{
   dispatch('setAuthData', {
    idToken: response.data.idToken,
    expiresIn: response.data.expiresIn,
    refreshToken: response.data.refreshToken
   });
  });
 },
 register({dispatch}, authData){
  axios.post(
   '/accounts:signUp?key=[API_KEY]',
  {
   email:authData.email,
   password:authData.password,
   returnSecureToken:true
  }).then(response=>{
   dispatch('setAuthData', {
    idToken: response.data.idToken,
    expiresIn: response.data.expiresIn,
    refreshToken: response.data.refreshToken
  });
   console.log(response);
   router.push('/');
  });
 },
 setAuthData({commit, dispatch}, authData){
  const now = new Date();
  const expiryTimeMs = now.getTime() + authData.expiresIn * 1000;
  commit('updateIdToken', authData.idToken);
  localStorage.setItem('idToken', authData.idToken);
  localStorage.setItem('expiryTimeMs', expiryTimeMs);
  localStorage.setItem('refreshToken', authData.refreshToken);
  setTimeout(() =>{
   dispatch('refreshIdToken', authData.refresh_token);
  }, authData.expiresIn * 1000);
 }
}
ログアウト機能の実装
src/App.vue
ログアウトボタンを用意します。
<template>
<div id="app">
 <header>
  <template v-if="isAuthenticated">
   <router-link to="/" class="header-item">掲示板</router-link>
   <span class="header-item" @click="logout">ログアウト</span>
  </template>

  <template v-if="!isAuthenticated">
   <router-link to="/login" class="header-item">ログイン</router-link>
   <router-link to="/register" class="header-item">登録</router-link>
  </template>
 </header>
 <router-view></router-view>
</div>
</template>

<script>
export default {
 computed: {
  isAuthenticated(){
   return this.$store.getters.idToken !== null;
  }
 },
 methods:{
  logout(){
   this.$store.dispatch('logout');
  }
 }
};
</script>
methodsにlogout関数を用意して、storeにdispatchします。
src/store/index.js
 logout({commit}){
  commit('updateIdToken', null);
  localStorage.removeItem('idToken');
  localStorage.removeItem('expiryTimeMs');
  localStorage.removeItem('refreshToken');
  router.replace('/login');
 },
actions:の中のloginの下あたりに上記のlogoutを追加します。
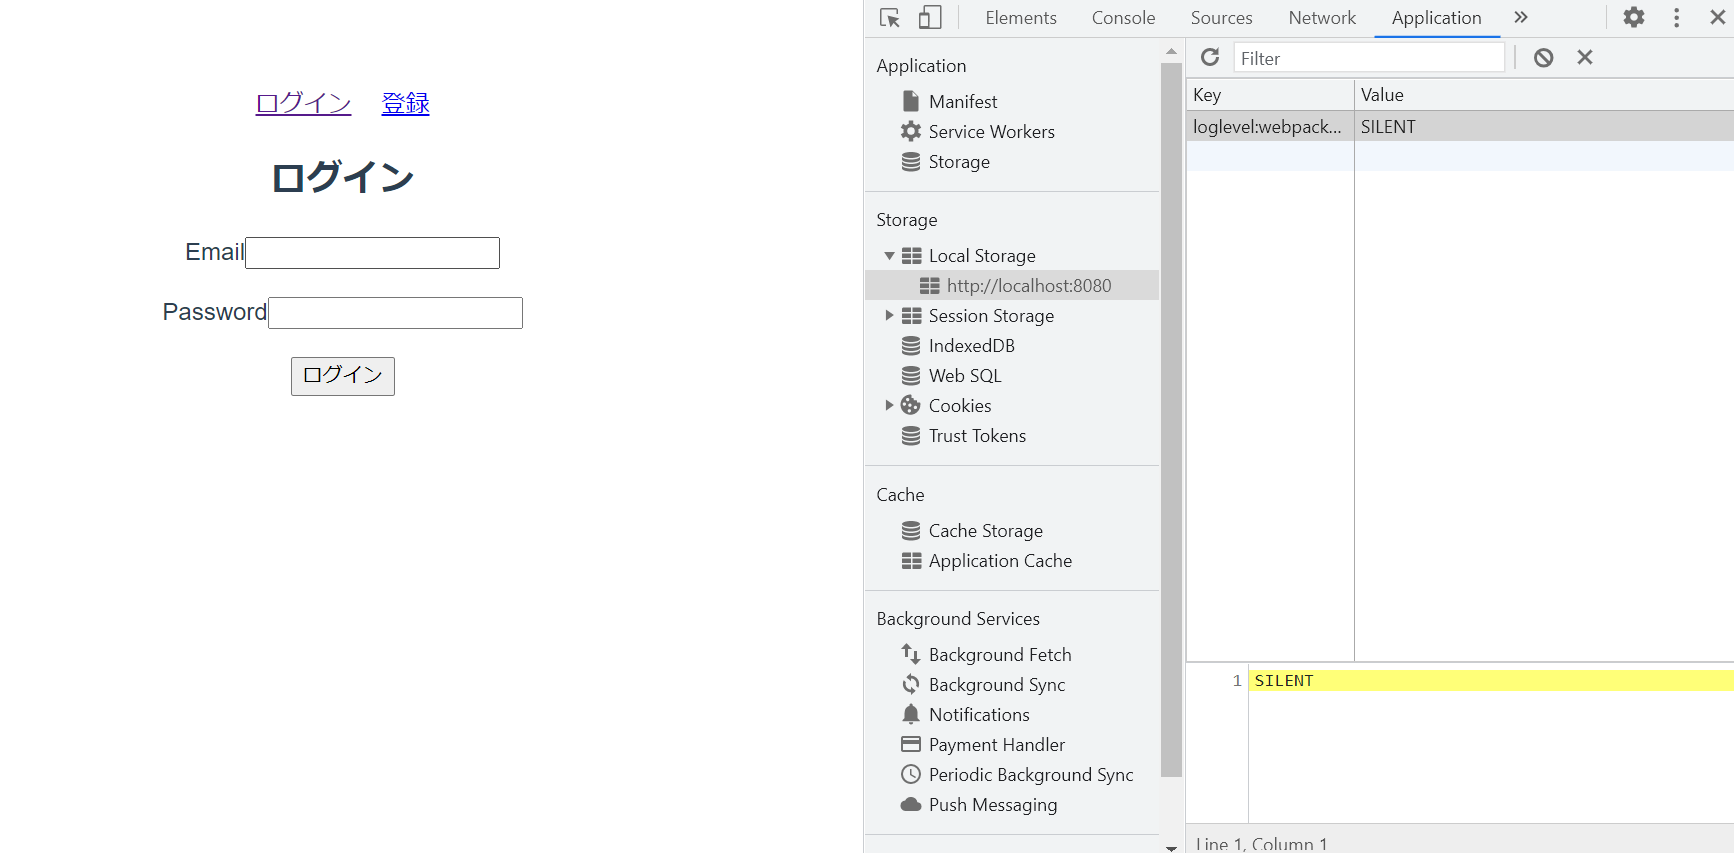
ログアウトボタンが押されたときに、local storageに保存されているidToken, epireyTimeMs, refreshTokenの値を取り除いて、/loginにrouter.replaceでナビゲーションさせます。

ログアウトを押すと、ログイン画面が表示されて、Local Storageに保存されていたkeyとvalueがなくなったことがわかります。
まとめ
- tokenを用いてユーザーの認証をする。
- Firebaseを用いた認証機能を簡単にかつ無料で利用することができる。
- Vue.jsおよびaxiosを用いてフロントエンド側のユーザー認証機能を構築できる。
- vue-routerを用いて、フロントエンドでルーティングできる。
- local storageをクリアすることでログアウト機能を実装できる。
今回のログイン認証機能のバックエンドはfirebase側に任せていますが、自前でバックエンド側も用意しようとする場合、axiosのパスの部分をcontrollerや(laravel利用想定)や別のパスに変えてあげればいけそうかと思います。
Githubにコードを公開しています。ご利用の際は、firebaseの設定部分だけご自身で用意したものに値を変更して下さい。
以上になります。お疲れ様でした!
